This post may contain affiliate links.

5 Tips for Planting a Vegetable Garden
Yay! You are ready to physically plant your garden! I wanted to give you my 5 tips for planting a vegetable garden and go over my method for this because putting in a little extra effort up front will pay off with a healthy and bountiful garden come mid-summer! The work will for sure be worth it, enjoy these tips!
1. Get Outside and Physically Define Your Site
If you haven’t checked out my garden planning and mapping post, you want to before you go any further! Having a map and plan is key to saving you headaches later on!
After your map is created, it’s time to physically layout your site.
This is exciting because the garden is starting to come to life! Mark it out with stakes and flags if you are planting directly in the ground, or, if you’re building your own raised beds, check out my quick DIY Tutorial HERE.
This is also the time when you will want to physically mark out and put up any fencing for the garden. We put up deer fencing every year because I swear our property is a deer thruway and they would decimate our beds!
2. Amend Your Soil & Bed Prep
Here are my tips/reminders for amending your soil to get it where it needs to be:
First, remember everything begins and ends with soil, you get what you give. Flowers and veggie plants vigorously suck the nutrients out of the soil so I can’t stress enough that your soil has to be healthy and nutrient dense from the start.
- Utilize compost – Can’t speak highly enough of this stuff! Compost is king! It improves soil structure, provides essential nutrients and enhances fertility. It makes sandy soil retain water better and it makes clay soil drain better, like magic! You can find compost at your local garden center, either by the bag or by the yard. I amend our soil just before we plant in the early spring by mixing in compost – about 4 bags per 4’x8′ bed.
- Follow soil test recc’s – Lucky for you if you got your soil tested! You can follow their super helpful recommendations on exactly what to do to amend your soil.
- Consider beneficial nematodes and earth worm castings. Both carry essential nutrients to keep your soil strong AND they deter harmful pests that could come to attack your plants later in the season!
3. Watering & Organic Weed Management Plan
Before actually planting you’re going to want to think about your plan for watering and weed management.
Watering
Drip irrigation or even soaker hoses are a great option for two reasons – less work for you (YES!) and the water is delivered directly to the plants’ roots which means less water on the foliage. They are pretty easy to set up with the right materials but can get clogged easily, especially in clay soils, definitely still worth considering though!
I recommend checking out Dripworks.com or Home Depot for irrigation kits and supplies!
The next best option is watering by hand with a garden hose or watering can. Again it is best to deliver water directly into the soil because plants drink through their roots, try your best not to wet the plants’ foliage when watering. Wet foliage, especially prolonged wetness, invites fungus. Think of plants like people, when we’re thirsty we don’t take a shower, we drink through our mouths!
Sprinklers are the very last thing I would recommend for the same reason as above, plants don’t need showers, and consistency wetting their foliage is a sure initiation for pests.
Watering Tip: Water in the morning! Plants like to hydrate throughout the hot, sunny days (much like humans!). Watering at night can cause rot and invite harmful fungi and diseases!
Whether you are using irrigation, a garden hose, a watering can or sprinkler, just make sure you have your plan set.
Weed Management
As for organic weed management, my recommendations depend on garden size. Because we grow organically we do not use harmful chemicals in our garden. Our garden is relatively small so I weed by hand or use my good old collinear hoe to physically remove them. Remember, you’ll probably have to weed weekly this way!
Mulching is another great organic method for weed suppression in any size bed. Types of mulch include traditional, rotted leaves, straw or dried grass. Note that old hay is not good for mulch because it may harbor weed seeds.

4. Fertility & Pest Control Plan
I always like to have at least a basic idea of what my fertility plan for the green will be at the start of each season. This means soil health, fertilizer additives, organic pesticides and possibly the use of beneficial insects. I know especially pest control isn’t the most exciting thing to think about but you’ll be happy to at least have some ideas in place not if, but when, an insect or fungus starts attacking your crops!
Fertilizers
I am constantly learning more and more each year about what’s best and how some plants require different nutrient balances. But a great place to start, as was stated above, is adding compost, manure and worm castings to your beds. These are naturally-occurring rockstar soil additives that literally make your soil do magical things for your plants’ root systems.
Additionally, we fertilize with fish emulsion every 7-10 days and recently I’ve been loving compost tea, we prefer to do a monthly application with this. If you’re not big into either of those, below I’ve inked my other preferred veggie and herb fertilizers!

Pest & Fungus Control
I always say the best thing you can do to prevent insect and disease attacks in the garden is to start with and KEEP your plants healthy. More often than not, pests attack weak plants. So this circles back to the above about proper watering techniques, sunlight and soil fertility. A happy and healthy plant won’t be a pest’s first target because it’s easier to attack plants that are already in a decline.
That said, even with doing everything perfect health-wise for your garden, I guarantee you will encounter something at some stage of gardening and it will be extremely frustrating.
To start, I suggest adding beneficial nematodes to your soil early in the season. They may sound icky but they’re not and they do SO MUCH good for the health of your plants by killing harmful insect pests in their larval stage at the soil level.
I would also look into adding the larvae of beneficial predator insects to your garden – things like lady bugs, praying mantis lacewings and assassin bugs! They take care of certain infestations by preying on the larvae, pupil or adult pest insects, it’s awesome!
This site is where I purchased our beneficial nematodes and insects for this year if you want to give it a try!
Besides beneficial insects, my top insecticidal/fungicidal organic pest controls I recommend having on hand are neem oil, insecticidal soap, horticultural oil and copper. These are both organic and work wonders for most fungi and insect pests. I also make a DIY preventative spray with my essential oils, recipe and tutorial here, to help deter insects and even small animals!
Pest Tip: Make sure to check your plants daily for signs of pests and disease! You would be amaze what even just a few days of neglect can do to the garden.
How to Research a Pest or Disease
It is important to research and know exactly what fungi or insect is attacking your plants in order to properly treat it. For example with the ever-dreaded squash vine borer, sprays won’t do a thing, you’ll have to preform surgery on the stems of your plants and physically remove the insects (gross, but necessary). And some sprays work better than others on certain fungi and insects.
For me what usually works is a quick google search of something like “white spots on zucchini leaves” or “large holes on lower leaves of cabbage” or even a more broad search like: “common tomato plant diseases/insect pests.” It’s easy to identify and learn the specific recommended treatment that way!
I also purchased this bug ID chart from amazon (they have one for every region of the US!), it has been SUPER helpful in identifying insect pests in the garden. Once you know even the TYPE of bug doing the damage you will know better what type of control to use!
Check out my DIY Organic Pest Spray tutorial here!
Lastly, I want to note that more and more I’m seeing “fungus-resistant” veggie plants on the market and I think that’s great. Of course these are new, hybrid varieties and there are moral values to consider there, (namely are they still beneficial for pollinators?) but as far as ease of controlling pests in the garden these new varieties would definitely be the way to go!

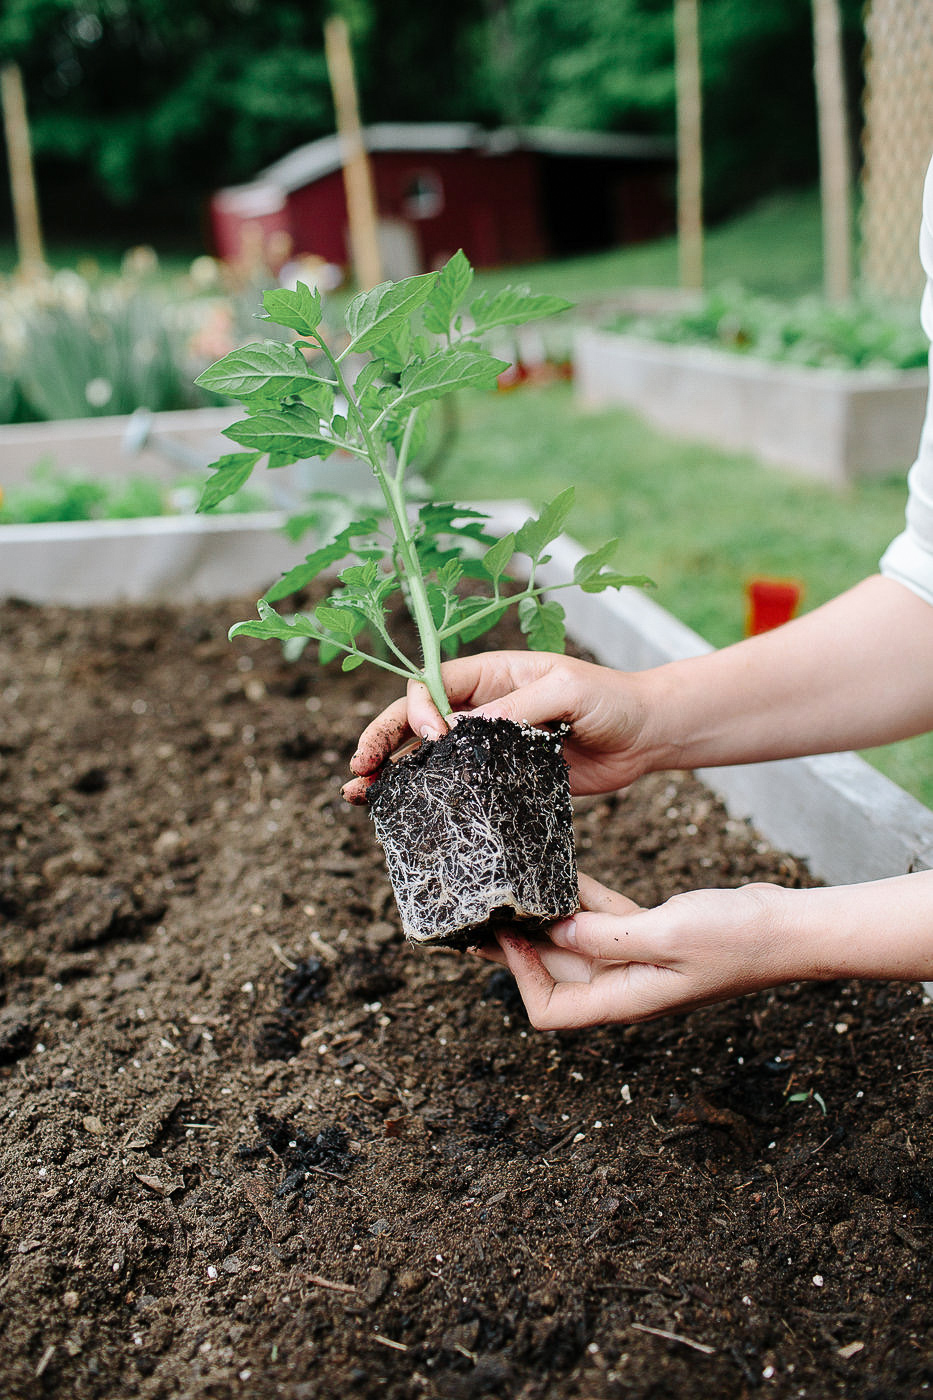
5. Time to Plant!
Yay! Time to plant and watch your garden flourish! Here are my quick tips and steps for planting:
- A butter knife works great for digging in small seedlings or use a small hand trowel for digging in bigger plants.
- Wet the soil slightly so it holds your holes better.
- Dig your holes a bit bigger than the root ball of the plant (both wide a deep) so you don’t have to squish the roots in.
- Take your fingers and lightly break apart some of the root ball, sort of like you’re massaging it. The idea is to loosen up the roots just a bit and let them know it’s time to spread out. If you have an extremely root-bound plant with LOTS of roots and barely any soil you can even take a (clean and sharp) knife and make a few cuts on the bottom, this will promote more roots to grow and let it know it’s not in the pot anymore, it will be extra happy to spread out in the ground!
- After planting, water seedlings in deeply to avoid shock from the transplanting and sprinkle new plantings with some mycorrhizal fungi. It’s a beneficial fungi combo that plants roots and continues to physically help strengthen their root systems. Legit this stuff is magical, I highly recommend using it!!
Apply a weekly application of liquid fish emulsion for the first 6-8 weeks (until the plants look lush, green, bushy and healthy). Our favorite brand for seaweed fertilizer and fish emulsion is Neptune’s Harvest, just follow the instructions on the labels. We also apply compost tea once a month, this stuff is a game changer.
Tomato Planting Tip: When planting tomato starts remove the lower leaves so you have about 4-6″ of bare stem. Dig your hole extra deep and bury that bare stem leaving just a couple inches above ground. This will make for a MUCH stronger tomato plant because it’s stem actually has the abilities to grow roots when buried under ground like that!
My last reminder… think of you plants as living, breathing life. Similarly to humans and animals, the better the plants are cared for in the beginning the better they’ll be for life.
—
As always I LOVE to hear from you all so leave me a comment below with your tips and tricks for planting or simply just to say hi!
Looking for more gardening posts? Check these out!
Planning, Mapping and Planting your Veggie Garden
5 Tips for Planting a Vegetable Garden
9 Tips for a Low Maintenance Veggie Garden
DIY Raised Garden Beds
Complete Guide to Growing and Harvesting Peonies
Cut Flower Garden Planning
Seed Starting for Beginners
Container Gardening Tips
Gardening Supplies Favorites
Quick Tips for Long-Lasting Lilacs
And more coming soon! Sign up for my newsletter to stay up to date on new gardening posts!


[…] you’ve planned and mapped your garden click here for the next step — 5 Tips for Planting a Vegetable Garden. I include how to physically define your site on the ground, a DIY raised bed tutorial, how to […]